Chain Adjustment Guide
Measuring Chain Slack
On a level surface, put the bike up on a stand where the rear wheel is elevated and spinning freely. Then, spin the rear wheel until you find the point in which the chain is the tighest.

To check the slack, find the intermediate position between the chain tensioner and the chain support bolt. At this point, measure the distane the chain is able to move by pushing the chain up, and then down. This is demonstrated in the diagram to the right.
The total distance from the center of the chain link at the top most point, the the center of the link at the bottom most point, should be between 38mm and 48mm (40mm - 50mm on the WR250X). If it is too tight or too loose, you should adjust your chain by following the instructions below.
Adjusting The Chain
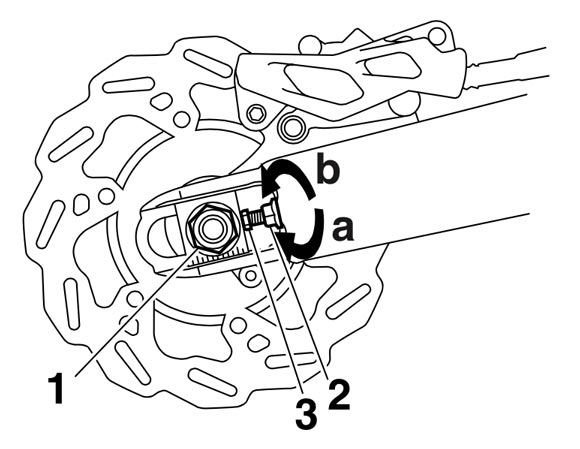
Start by loosening the main axle nut (1) and both lock nuts (2). Now you will be able to turn the drive chain puller bolt (3) in to loosen the chain (a), or out to tighten the chain (b). It is very important you do this the same amount on both sides, to ensure proper alignment. As you make adjustments and take measurements, make sure the rear wheel is constantly pushed as far forward as it will go, to make sure there is no space between the head of the drive chain puller bolt and the swingarm end plates (square blocks around the axle bolt).
Once you’ve adjusted the chain to be within the recommended tolerance, tighten both locknuts (2) and then tighten the axle nut (1). See the table below for torque specifications.
| Part Name | Newton Meters | Foot-Pounds |
|---|---|---|
| Rear Wheel Axle Nut | 125 Nm | 90 ft lb |
| Chain Locknut Bolts (2x) | 16 Nm | 12 ft lb |


")